TL;DR:如果不想折腾,可以在文末获取源码,直接粘贴到对应目录即可。
书接上回,这次从这个美丽的灵动岛菜单栏的自定义开始说起。
其实 Blowfish 作者自己设计的这个菜单就和自己的背景相当契合了,如图。
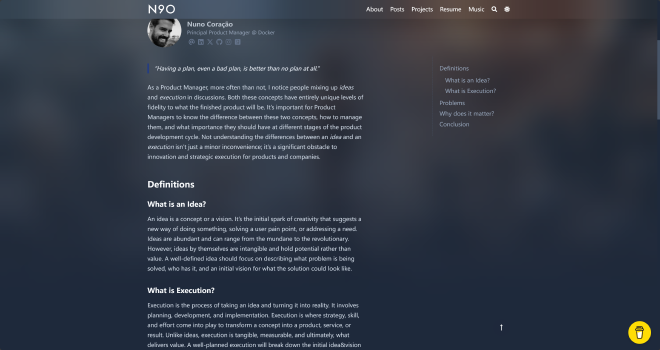
本来就觉得,嗯看着很顺眼挺不错的,直到我突然想起来很久之前看到过这么个站:

感觉这种小巧的导航菜单栏确实更适合博客。想到 Hugo 强大方便的自定义,于是就立刻开始搞了起来。所以,我的魔改版:
- 圆角!而且要非全宽。
- 滚动切换网站标题 / 页面标题
- 随滚动深度增加模糊效果(Blowfish 原生支持)
- 下划隐藏,上划显示


一个个提吧!
写在前面#
如果用户的 layouts 文件夹下有模板,Hugo 就会用用户的 layouts 覆盖主题的 layouts,这就是 Hugo 强大的自定义的方式。因此在开始前,不妨先复制一份 themes/blowfish/layouts/partials/header 文件夹到 layouts/partials/header 并新建一个名为 island.html 的文件。本自定义基于 fixed.html 模板,所以你可以直接将 fixed.html 复制进去(还可以把里面引用的 basic.html 也复制进去,如果你不想污染原有的文件的话)。 别忘了在 params.toml 中把菜单样式名改为 island!
如果不想折腾,可以在文末获取源码,直接粘贴到对应目录即可。
圆角和宽度#
这里就要得益于好用的https://tailwindcss.com/了,从此页面布局和样式可以不在几个窗口之间跳来跳去。这里直接上样式代码!
不过,Blowfish 并没有携带完整的 Tailwind CSS 包,所以你还需要在 assets/css/custom.css 中放入你缺少的样式。需要的文件在文末!
<div id="island-header"
  class="fixed rounded-full place-self-center top-4 pl-[24px] pr-[24px] w-full min-w-se max-w-se se:max-w-sm sm:max-w-md md:max-w-xl lg:max-w-2xl"
  style="z-index: 100;">
  <div id="menu-blur"
    class="absolute rounded-full opacity-0 inset-x-0 h-full nozoom shadow-2xl backdrop-blur-2xl shadow-lg">
  </div>
  <div ...>
  </div>
</div>
这里我加了一个 id="island-header" 方便后面调用。
滚动切换标题#
这个功能其实是从 https://squidfunk.github.io/mkdocs-material/ 抄来的,算是 Material for MkDocs 的一个特性。在原来的代码里,它是这么写的:
<!-- header.html -->

<!-- Header title -->
<div class="md-header__title" data-md-component="header-title">
  <div class="md-header__ellipsis">
    <div class="md-header__topic">
      <span class="md-ellipsis">
        {{ config.site_name }}
      </span>
    </div>
    <div class="md-header__topic" data-md-component="header-topic">
      <span class="md-ellipsis">
        {% if page.meta and page.meta.title %}
          {{ page.meta.title }}
        {% else %}
          {{ page.title }}
        {% endif %}
      </span>
    </div>
  </div>
</div>
// header/title/index.ts
/**
 * Watch header title
 *
 * @param el - Heading element
 * @param options - Options
 *
 * @returns Header title observable
 */
export function watchHeaderTitle(
  el: HTMLElement, { viewport$, header$ }: WatchOptions
): Observable<HeaderTitle> {
  return watchViewportAt(el, { viewport$, header$ })
    .pipe(
      map(({ offset: { y } }) => {
        const { height } = getElementSize(el)
        return {
          active: y >= height
        }
      }),
      distinctUntilKeyChanged("active")
    )
}

/**
 * Mount header title
 *
 * This function swaps the header title from the site title to the title of the
 * current page when the user scrolls past the first headline.
 *
 * @param el - Header title element
 * @param options - Options
 *
 * @returns Header title component observable
 */
export function mountHeaderTitle(
  el: HTMLElement, options: MountOptions
): Observable<Component<HeaderTitle>> {
  return defer(() => {
    const push$ = new Subject<HeaderTitle>()
    push$.subscribe({

      /* Handle emission */
      next({ active }) {
        el.classList.toggle("md-header__title--active", active)
      },

      /* Handle complete */
      complete() {
        el.classList.remove("md-header__title--active")
      }
    })

    /* Obtain headline, if any */
    const heading = getOptionalElement(".md-content h1")
    if (typeof heading === "undefined")
      return EMPTY

    /* Create and return component */
    return watchHeaderTitle(heading, options)
      .pipe(
        tap(state => push$.next(state)),
        finalize(() => push$.complete()),
        map(state => ({ ref: el, ...state }))
      )
  })
}
// Header title in active state, i.e. page title is visible
&--active .md-header__topic {
  z-index: -1;
  pointer-events: none;
  opacity: 0;
  transition:
    transform 400ms cubic-bezier(1, 0.7, 0.1, 0.1),
    opacity   150ms;
  transform: translateX(px2rem(-25px));
}

// Second header topic - title of the current page
+ .md-header__topic {
  z-index: 0;
  pointer-events: initial;
  opacity: 1;
  transition:
    transform 400ms cubic-bezier(0.1, 0.7, 0.1, 1),
    opacity   150ms;
  transform: translateX(0);
}
只摘了一部分,但也大概可以说明它的一个原理了。
1. 一开始两个标题是都叠放在一起的,这一步要通过 css 的绝对定位实现;
2. 默认情况下,网站名称可见,页面标题不可见,不可见的元素的 `z-index: -1; opacity: 0;` ;
3. 检测滚动,当向下滚动到一级标题下方的时候,触发切换,给 header_title 加一个 active;
4. 对于这个 active 类,让 css 处理动画,使用 `transitions` 和 `transforms` ;
5. 当向上滚动回到顶部的时候,把 active 类去掉,再处理动画。
其实很简单,但是我前端没怎么学过,所以实现起来也是费了一些功夫。首先需要找到菜单栏对应的标签,给它一个 id 这样我们在写 JS 的时候方便操控它。直接搜索 .Site.Title 就可以找到这个对应的标签。给上一层 nav 加上一个 id。
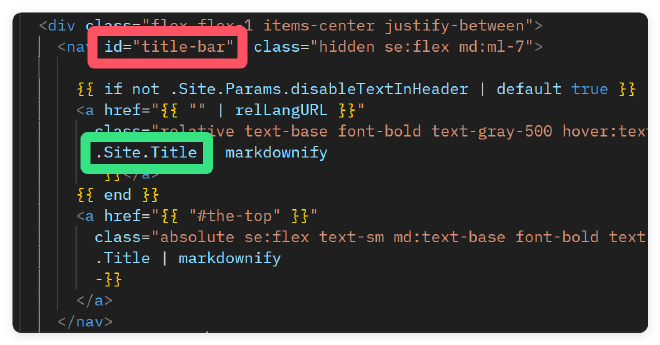
由于要分别定义两个标题的样式,所以两个标题也得上 id。方便起见这里直接提供我的代码:
<nav id="title-bar" class="hidden se:flex md:ml-7">
    {{ if not .Site.Params.disableTextInHeader | default true }}
    <a id="page-title-bar" href="{{ "" | relLangURL }}"
      class="relative text-base font-bold text-gray-500 hover:text-gray-900">{{-
      .Site.Title | markdownify
      -}}</a>
    <a id="article-title-bar" href="{{ "#the-top" }}"
      class="flex text-base font-bold text-gray-500 hover:text-gray-900">{{-
      .Title | markdownify
      -}}
    </a>
    {{ end }}
  </nav>
对应的样式:
#page-title-bar, #article-title-bar {
  transition: opacity 400ms, transform 400ms;
}

#page-title-bar {
  opacity: 1;
  transform: translateX(0);
}

#article-title-bar {
  opacity: 0;
  transform: translateX(20px);
}

.title-switched #page-title-bar {
  opacity: 0;
  transform: translateX(-20px);
}

.title-switched #article-title-bar {
  opacity: 1;
  transform: translateX(0);
}
然后就可以开始实现逻辑了!
let lastScroll = 0;
let isArticleTitleVisible = false;

window.addEventListener("scroll", function (e) {
  const scroll = window.pageYOffset || document.documentElement.scrollTop;
  const scrollDirection = scroll > lastScroll ? "down" : "up";

  const title_bar = document.getElementById("title-bar");
  const heading = document.querySelector("h1");

  var background_blur = document.getElementById('menu-blur');
  background_blur.style.opacity = (scroll / 300);

  if (heading && window.location.pathname !== "/") {
    const headingRect = heading.getBoundingClientRect();
    const headingOffset = headingRect.bottom + scroll;
    const switchPoint = headingOffset - 200; // 切换点
    const restorePoint = headingOffset + 100; // 恢复点

    if (scrollDirection === "down" && scroll > switchPoint && !isArticleTitleVisible) {
      title_bar.classList.add("title-switched");
      isArticleTitleVisible = true;
    } else if (scrollDirection === "up" && scroll < restorePoint && isArticleTitleVisible) {
      title_bar.classList.remove("title-switched");
      isArticleTitleVisible = false;
    }
  }

  lastScroll = scroll <= 0 ? 0 : scroll; // 处理滚动到顶部的情况
});
这里和 h1 标题配合的关键就在于 headingOffset 的获取。switchPoint 和 restorePoint 可以自己适当前移后移挑个合适的时机。
随滚动深度增加模糊效果#
其实这个已经实现完了。
就在上面的代码里,有一个
var background_blur = document.getElementById('menu-blur');
background_blur.style.opacity = (scroll / 300);
大道至简呐!
下划隐藏和上划显示#
这个我一开始也是用的 translateY,但是发现 translate / transform 天生和 fixed 元素八字不合啊,用了的话我的手机菜单页就得失效了,于是用了一个和滚动深度控制类似的办法。
原理是这样的:
1. 设定阈值,当页面下滑超过阈值时允许下划隐藏菜单栏、上划显示;
2. 对于下划隐藏,给予延迟效果,即累积下划量到一定值后,菜单栏继续随下划上移出屏幕;
3. 一旦累计下划被上划打断,重新累积;
4. 上划显示不太需要延迟,可以立即响应。
所以核心在于判断划动方向和划动量。还有一点很关键,就是菜单栏的位置变化得是连续的,所以如果把它看作一个累计下划量的函数就不太合适。我是拿每次划动量来做的。上代码!
let lastScrollTop = 0;
let lastScrollDirection = 0;
let island_header_style_top = 1;
let accumulated_scroll = 0;

window.addEventListener("scroll", function (e) {
  const scroll = window.pageYOffset || document.documentElement.scrollTop || document.body.scrollTop || 0;
  let currScrollDirection = scroll - lastScrollTop > 0 ? 1 : -1; // 1 for down, -1 for up

  const island_header = document.getElementById("island-header");
  const heading = document.querySelector("h1");
  const headingDistance = heading.getBoundingClientRect();
  const headingOffset = headingDistance.bottom + scroll;
  const threshold = headingOffset * 2;

  if (scroll > headingOffset) {
    if (currScrollDirection !== lastScrollDirection) {
      accumulated_scroll = 0;
    } else {
      accumulated_scroll += Math.abs(scroll - lastScrollTop);
    }

    if ((accumulated_scroll > threshold || currScrollDirection == -1) && (scroll > headingOffset + threshold / 2)) {
      island_header_style_top = Math.max(
        -4.5,
        Math.min(
          1,
          (island_header_style_top - ((scroll - lastScrollTop) / 12) ** 3)
        )
      );

      island_header.style.top = island_header_style_top + "rem";
    }
  }

  lastScrollTop = scroll;
  lastScrollDirection = currScrollDirection;
});
这里的 island-header 指的就是 menu-blur 上一层的真正的菜单栏。其实也非常朴实,跟前面的差不多,有点像是写什么课程作业了哈哈哈。
文件#
别忘了在 params.toml 中把菜单样式名改为 island!
希望你喜欢!

